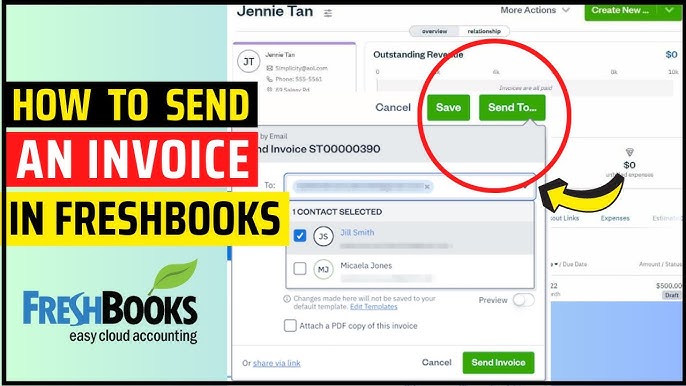
To create professional invoices in FreshBooks, log in and navigate to the “Invoices” section. Click “Create New Invoice” and follow the prompts.
FreshBooks simplifies the invoicing process for businesses of all sizes. Creating professional invoices ensures timely payments and accurate financial records. This step-by-step guide will help beginners navigate the platform effortlessly. FreshBooks offers user-friendly features that streamline invoice creation, customization, and management.
Proper invoicing reflects professionalism and boosts client trust. By following this guide, you will learn how to set up your account, customize invoice templates, add client details, itemize services, and send invoices. Mastering FreshBooks invoicing can improve your business efficiency and cash flow. Let’s get started with creating your first professional invoice in FreshBooks.
Introduction To Freshbooks
FreshBooks is a popular accounting software designed for small business owners. It simplifies tasks like invoicing, tracking expenses, and managing projects. This guide will help beginners create professional invoices using FreshBooks.

What Is Freshbooks?
FreshBooks is an online accounting software tailored for small businesses. It offers a user-friendly interface and robust features. The software helps manage invoices, track expenses, and handle client relationships. FreshBooks is cloud-based, so you can access it anywhere. This makes it a favorite among freelancers and entrepreneurs.
Benefits Of Using Freshbooks
FreshBooks offers many benefits that make it essential for small business owners:
- Ease of Use: The interface is intuitive and easy to navigate.
- Time-Saving: Automate routine tasks like invoicing and expense tracking.
- Professional Invoices: Create polished invoices quickly.
- Cloud-Based: Access your data from any device.
- Secure: FreshBooks uses top-tier security measures to protect your data.
Here is a table that summarizes the key benefits:
| Feature | Benefit |
|---|---|
| Ease of Use | Navigate effortlessly through the software. |
| Time-Saving | Automate repetitive tasks. |
| Professional Invoices | Create polished invoices in minutes. |
| Cloud-Based | Access data from any device, anywhere. |
| Secure | Top-tier security for your data. |
Using FreshBooks can transform the way you manage your business finances. Its features are designed to save you time and effort. Start exploring FreshBooks today and see the difference.
Setting Up Your Freshbooks Account
Creating professional invoices in FreshBooks starts with setting up your account. Follow these steps to get started quickly and efficiently. This guide will help beginners navigate through the initial setup.
Creating An Account
To begin, visit the FreshBooks website. Click on the “Sign Up” button. Enter your email address and create a strong password. You will receive a confirmation email. Click the link in the email to verify your account.
Fill out your business details. This includes your company name, business type, and contact information. Ensure all information is accurate. This helps in creating professional invoices later.
Configuring Account Settings
After creating your account, navigate to the “Settings” menu. Here, you can configure various account settings to suit your business needs.
| Setting | Description |
|---|---|
| Business Profile | Enter your business name, logo, and contact details. |
| Currency | Select the currency you will use for invoicing. |
| Payment Methods | Set up the payment methods you accept. |
Make sure to save your settings. This ensures all your invoices are consistent and professional.
Navigating The Freshbooks Dashboard
Understanding the FreshBooks dashboard is crucial for creating professional invoices. This guide will help you navigate the interface easily.
Dashboard Overview
The FreshBooks dashboard offers a user-friendly interface. It displays all essential information at a glance.
Here is what you’ll see:
- Invoices: Monitor your sent and received invoices.
- Expenses: Keep track of your business spending.
- Projects: Manage ongoing and upcoming projects.
- Clients: Access client information quickly.
The layout is clean and straightforward. The left sidebar offers easy navigation.
Key Features
The FreshBooks dashboard includes several key features designed to simplify invoicing:
- Quick Access: Instantly create new invoices, estimates, and expenses.
- Recent Activity: View recent transactions and activities.
- Income and Expense Reports: Generate detailed financial reports.
- Notifications: Receive important updates and reminders.
These features make managing your finances simple. They offer everything you need at your fingertips.
| Feature | Description |
|---|---|
| Invoices | Track sent and received invoices easily. |
| Expenses | Monitor your business expenses efficiently. |
| Projects | Manage all your projects from one place. |
| Clients | Access client information with a click. |
Use the dashboard to streamline your invoicing process. It provides all the tools you need for professional billing.

Creating A New Invoice
Creating a new invoice in FreshBooks is simple and quick. With a few clicks, you can send professional invoices to your clients. This guide will walk you through the process.
Starting A New Invoice
First, log in to your FreshBooks account. On the dashboard, find the “Invoices” tab. Click on it to open the invoices section. Next, click the “Create New Invoice” button. A new invoice template will open.
Entering Client Information
Once you have the invoice template, start by entering your client’s details. Fill in the client’s name, email address, and company name. Ensure all information is correct to avoid errors.
You can also add more details such as the client’s phone number and address. This helps in keeping records accurate and complete. FreshBooks allows you to save client details for future use.
Here’s a quick table to guide you through the client information fields:
| Field | Description |
|---|---|
| Client Name | Full name of your client |
| Email Address | Client’s email for sending the invoice |
| Company Name | Client’s company, if applicable |
| Phone Number | Optional but useful for contact |
| Address | Client’s billing address |
After entering all the client information, proceed to add the items or services. Make sure each item has a clear description and price. This ensures your client understands what they are paying for.
Adding Invoice Details
Creating a professional invoice in FreshBooks is easy. The first step is to add the invoice details. This includes itemizing services or products and setting payment terms. Let’s dive into these sections to make your invoices look professional.
Itemizing Services Or Products
List all the services or products you provided. Each item should have a description, quantity, rate, and total amount. This helps your client understand what they are paying for. Here’s a simple example:
| Item | Description | Quantity | Rate | Total |
|---|---|---|---|---|
| 1 | Web Design | 10 hours | $50/hour | $500 |
| 2 | Hosting | 1 month | $20/month | $20 |
Clearly itemizing services or products improves transparency. It also reduces the chance of payment disputes.
Setting Payment Terms
Always set clear payment terms. This includes the due date and accepted payment methods. You can also add late payment fees. Here’s a simple example:
- Due Date: 30 days from the invoice date
- Payment Methods: Credit Card, PayPal, Bank Transfer
- Late Payment Fee: 2% per month on overdue amounts
Clear payment terms ensure timely payments. They also help in maintaining a healthy cash flow.

Customizing Your Invoice
Creating a professional invoice is crucial for your business. FreshBooks makes it simple to customize your invoice. This section will guide you through adding your logo and choosing a template. Follow these steps to make your invoice stand out.
Adding Your Logo
Your logo represents your brand. Adding it to your invoice makes it look professional. Follow these steps to add your logo in FreshBooks:
- Open FreshBooks and log in to your account.
- Go to the Settings section.
- Click on Company Profile.
- Find the Upload Logo button.
- Select your logo file and upload it.
- Save your changes.
Your logo will now appear on all your invoices.
Choosing A Template
FreshBooks offers various templates for your invoices. Choosing the right template can enhance the look of your invoice. Follow these steps to choose a template:
- Go to the Invoices section.
- Click on New Invoice.
- Select the Template dropdown menu.
- Browse through the available templates.
- Click on the template you like.
- Save your selection.
Now your invoices will use the selected template. This makes your invoices look professional and appealing.
Sending And Tracking Invoices
Creating professional invoices in FreshBooks is simple. Sending and tracking them ensures you get paid on time. This guide will help you send and track invoices easily.
Sending Via Email
FreshBooks lets you send invoices via email quickly. Follow these steps:
- Log in to your FreshBooks account.
- Navigate to the Invoices section.
- Click on the Create New Invoice button.
- Fill in the necessary details such as client information, invoice items, and due date.
- Click the Send by Email button.
- Enter your client’s email address and add a personal message if needed.
- Click Send to email the invoice.
Sending invoices via email is fast and ensures clients receive them promptly.
Tracking Invoice Status
Tracking the status of your invoices is crucial. FreshBooks provides real-time tracking features.
| Status | Description |
|---|---|
| Sent | The invoice has been emailed to the client. |
| Viewed | The client has opened the invoice email. |
| Paid | The client has paid the invoice. |
| Overdue | The invoice has not been paid by the due date. |
To track invoice status, follow these steps:
- Log in to your FreshBooks account.
- Go to the Invoices section.
- Find the invoice you want to track.
- Check the Status column for real-time updates.
Tracking ensures you know when clients view and pay your invoices.
Managing Payments And Reports
Managing payments and generating reports in FreshBooks is crucial. This process ensures your finances stay organized and transparent. Following these steps will help you efficiently manage your payments and reports in FreshBooks.
Recording Payments
Recording payments in FreshBooks is simple. Follow these steps to record a payment:
- Go to the Invoices section.
- Select the invoice you want to record a payment for.
- Click on Record Payment.
- Enter the payment details, including date, amount, and payment method.
- Click on Save to record the payment.
Recording payments ensures your accounts are up-to-date. It helps you track which invoices have been paid. This step is essential for maintaining accurate financial records.
Generating Financial Reports
Generating financial reports in FreshBooks allows you to analyze your business performance. Follow these steps to generate a financial report:
- Navigate to the Reports section.
- Select the type of report you need, such as Profit & Loss or Expense Report.
- Choose the date range for your report.
- Click on Generate Report.
Financial reports provide a clear view of your business’s financial health. They help in making informed decisions and planning for the future. Regularly generating reports ensures you stay on top of your finances.
By efficiently managing payments and generating reports, you can maintain accurate financial records. This practice is essential for the success of your business.
Tips For Professional Invoicing
Creating professional invoices in FreshBooks is essential for any business. Professional invoices ensure timely payments and build credibility with clients. Below are some key tips for professional invoicing that will help you streamline your billing process.
Ensuring Accuracy
Accuracy is crucial in invoicing. Ensure all client details are correct. Double-check the client’s name, address, and email. Use the auto-fill feature in FreshBooks to minimize errors.
List each service or product with precision. Specify quantities, rates, and subtotals for clarity. Include the correct date for each service provided. This helps clients understand the billing period.
Always review your invoices before sending them. Use FreshBooks’ preview feature. This ensures you catch any mistakes. Accurate invoices lead to faster payments.
Following Up On Overdue Invoices
Sometimes, clients miss the payment deadline. FreshBooks has automated reminders. Set up reminders to follow up on overdue invoices.
Be polite but firm in your reminders. Mention the overdue amount and the new due date. Use FreshBooks’ template messages for consistency.
If the invoice remains unpaid, consider a phone call. Personal follow-ups can be more effective. Keep a record of all communications. This helps in case of future disputes.
Below is a sample follow-up email template:
Subject: Reminder: Invoice #12345 Overdue

Dear [Client Name],

This is a friendly reminder that Invoice #12345 is overdue.
We would appreciate prompt payment to avoid any late fees.

Thank you,
[Your Name]
By following these tips, you can ensure a smooth invoicing process. This helps maintain a good relationship with your clients.

Frequently Asked Questions
How Do I Start Creating An Invoice In Freshbooks?
To start creating an invoice in FreshBooks, log into your account. Navigate to the “Invoices” tab and click “Create New. ” Follow the prompts to enter your client’s information, item details, and payment terms.
Can I Customize My Invoice Template In Freshbooks?
Yes, FreshBooks allows you to customize your invoice templates. You can add your logo, change colors, and adjust the layout to match your brand. Navigate to “Settings” and then “Customizations” to make changes.
What Details Should I Include In My Freshbooks Invoice?
Include your business name, client’s information, invoice number, date, itemized list of services/products, total amount, and payment terms. Clear details ensure your client understands the invoice and can pay promptly.
Can I Send Invoices Directly Through Freshbooks?
Yes, you can send invoices directly through FreshBooks. Once your invoice is ready, click “Send. ” You can email it to your client immediately or schedule it for later.
Conclusion
Creating professional invoices in FreshBooks is simple with our guide. Follow these steps for efficient invoicing. FreshBooks streamlines your billing process, ensuring timely payments and better financial management. Start implementing these tips today and enhance your business operations. Your invoicing will be accurate, professional, and hassle-free.


